Saturday, June 13, 2009

Tea


Centuries old, yes but still so mysterious. When Yvette and I were in Boston about two years ago, I came across a tea pot and decided to buy it. At the time I drank both coffee and tea but was more of a Lipton, or off the shelf tea type. And I wasn't real hard core coffee drinker either. Once I got my pot home...”Now What?”
So I went in search of some loose tea. I found a store in Northampton called The Cooks Shop where they had a huge selection of Teas from all over the world including China, Japan and Taiwan just to name a few. All types of teas and more importantly, the knowledge to help you weigh through all of the choices. I have only been there when the one of the two owners have been behind he main counter but both were extremely knowledgeable and friendly, always giving you little tidbits about the tea your buying or one you might be interested in. I have several types that I like the best but right now, Oolong, green and pu-erh are my favorites. The pu-erh is a bit like scotch as it is, or at least for me an acquired taste. It has an earthy Smokey flavor that clears the head and may make “the night after” a little easier to bare. I don't know if the Chinese have a specific tea for a hangover, but this one works for me.
Tea as a beverage is pretty cheap. You can probably make 40 cups of tea for what you spend at those drive through coffee places in a week. And, most teas can be infused more than once. The pu-erh tea can be infused up to four times before you toss the leaves in the compost.
The Cooks Shop has a website called Tea Trekker where you can find all of their teas and other related products.
I've learned to drink tea without sugar and have found it easier to drink unsweetened than say coffee. I usually make a pot every morning before work. I usually make enough so that when I'm done with the pot, if there is any leftover, it goes into a glass and straight into the refrigerator to be used as Ice Teas after a long hot day at work. The best ice tea you'll ever have! If you would like more info on tea, the Tea Trekker folks have written a book on it, it's called “The Story of Tea”. You can find it and the Tea Trekker website here.

Monday, June 8, 2009

Pho Bo, Part II “Some Assembly Required”

Okay, at this point you should have what amounts to a stockpot of broth that has been skimmed of it's fat. Sometimes the broth will take on the characteristic of Jello when it's chilled, which is a good thing. It means that you were able to extract all of the good stuff from the bones which directly relates to flavor. For this part of the recipe you will need the following:

1-Pkg of Bean Sprouts
1-Bunch Cilantro
1-Bunch Culantro
1-Bunch Thai Basil
2-Serrano or JalapeƱo Pepper, sliced
2-Limes, quartered
1-Large white Onion, halved and sliced thin
4-Scallions sliced thin
1-Pkg of Beef, or Beef Tendon Meatballs quartered
2-Reserved Beef Shanks from making soup, sliced at room temp.
¾ lb. Flank Steak or London Broil sliced very thin across grain
(Freeze steak slightly to make thin cutting easy)
1 Pkg Rice Noodles, Ban Pho vermicelli rice sticks
Rice Wine Vinegar
Fish Sauce
Hoisin Sauce
Sriracha Sauce

Begin by heating the broth. Meanwhile, assemble a garnish plate of the sprouts, cilantro, basil, peppers, and limes. I use a standard size dinner plate but you can do this on smaller plates for each person if you choose. On another plate I usually squeeze off enough Sriracha and Hoisin Sauce to cover each half of a small plate for each guest. This way the can dip whatever they want without fear! You may also leave the bottles on the table for refilling. Place the sliced onion in a small shallow bowl and cover with the vinegar. Place a pinch of salt and stir gently. You can do this ahead of time by as much as an hour or so and let sit at room temp.
Cook the noodles as per the instructions. Rice noodles cook slightly different than Americanized pasta so if it's your first time, you need to pay attention to cooking times and doneness. I usually cook them by boiling water and the pouring the water over the noodles in a bowl and then letting them sit for about ten to fifteen minutes. Then I rinse them under cold water and drain keeping them close at hand for serving. If you use this method, you want to make sure you have pot of boiling water at hand to quickly re-heat the noodles prior to plating (or bowling as the case may be). You can also use this boiling water to pre-heat your bowls because no one likes a cold bowl of pho.
Before you assemble the bowls, drain the onions. Add to the bowl some of the re-heated noodles on the bottom, some of the now pickled white onions, sliced cooked beef, sliced raw beef, and some of the scallions. Add the very hot broth to the bowl. This will cook the beef giving it a slight gray appearance.
Eating pho is a personal process. Some add sauces such as fish, Sriracha, or Hoisin directly to the broth. Add a few leaves of basil and cilantro at a time. Adding to many cool things will cool the broth so use your herbs wisely.

Sunday, June 7, 2009

Making Pho Bo-Part I, The Broth

It is without question, one of my more favorite meals. A death row meal if you will. If you search the net for the history of pho, you are likely to hear and read as many version as there are versions of this recipe. From my research, it appears that the soup originated as a possible result of the french influence is quite possible over 100 years old. But no matter the debate as to it's origin, one fact seems to be universally agreed upon, pho is a phenomenon that isn't a fad to fade anytime soon.
Making pho can be a rewarding experience but it can also be very time consuming. Looking through the internet will reveal that many have taken the recipe and slimmed down the work to a more "modern" or quicker versions. I have not tried these as I am by in large, a traditionalist. That is to say, I believe that some things should never change. I am not avert to change, I just don't think this recipe should change.
The first step in making pho-bo (beef version) is the broth. Here are the ingredients you will need for making the pho bo broth:

5 lbs. Beef Marrow bones cut into 2-3 inch pieces
3 lbs. of Beef Shank
1 Large Yellow Onion
1 thumb size piece of ginger root
8 whole cloves
2 4 inch cinnamon sticks
1 tablespoon of coriander seeds
4 peppercorns
1 1 inch chunk of yellow rock sugar
6 star anise
4 tablespoons of fish sauce

Start by sticking the cloves into the onion. Place onion and ginger root on grill and lightly char. We are not burning here, more like grilling the pieces. You can also do this over a burner or under a low broil setting in the oven. Just keep watch over them so they don't burn. When charred, set aside.
Combine the coriander seeds, star anise, and cinnamon stick in a small skillet. Toast the spices over medium heat tossing and stirring gently ever so often so they do not burn. Do this until slightly browned and fragrant. Set aside.
In a large pot (I use an 8 qt pot which is just barely big enough) place the bones and enough cold water to cover. Bring to a boil and boil vigorously for about 4 minutes. Turn heat off and pour bones, beef shank and water into a colander and drain bones. Wash pot out completely and dry. Carefully rinse off bones and shank of any scum or impurities with cool water and place back in pot. Fill again with cool water and add the ginger, onion, yellow rock sugar, fish sauce and spices and bring back to a boil. Turn heat down immediately and simmer for an hour. Remove beef shank after and submerse in a bowl of cold water (I add ice to make it really cold). This will congeal the fat and juices in the beef. Let cool for about 15 minutes and drain, wrap in plastic wrap and refrigerate.
Keep simmering the rest of the broth for about 3 hours more. the actual simmer time depends on patience. There are stories told of traditional Vietnamese cooking methods that let this broth simmer for 24 hours over charcoal fires. I would do this as well, if I had a decent charcoal fire and 24 hours to watch it. When the simmering is complete, turn off your heat and using a slotted spoon, remove bones, spices, onion and garlic and discard them. Strain the broth through a fine mesh strainer (use cheese cloth if your strainer isn't fine enough) and place pot of strained broth into the refrigerator. The next day, you will notice some of the fat has congealed on the top of the broth. Skim the fat off with spoon and discard. Your broth is now ready to be used. It can be frozen for a later use, or used right away. Stay tuned for II when we will assemble the bowls of our Pho-Bo.

Wednesday, June 3, 2009

Tipping

I could never understand why it was such a hassle when I was growing up. I would go out to dinner with my mother and stepfather and when the bill came, there was always a big discussion about what the tip should be. Even today, whenever I'm out with my wife, am always curious about what other people may be tipping and why. In my state, the mandated waitress wage is $2.63. Just so we're clear hear, let me say it again, two dollars and sixty three cents.
The accepted percentage for gratuity, depending on who you talk to, is somewhere between 15-20% leaning toward the higher end in higher cost of living areas such as cities etc. The determination is usually based upon service, rather than the quality of food, atmosphere etc. It should be about service but what are people really doing?
Recently, I had a discussion with a friend of mine that sat down in a rather prestigious restaurant in my area and ordered a rather pricey meal along with a very expensive bottle of wine. Our discussion ensued when I learned he basically stiffed the waitress because he did not include the wine in his calculation of the tip. This resulted in a significant loss of money on the part of the waiter. There was nothing wrong with the service and the meal was, "very good". However, he still felt the wine should not be included in his calculation. I asked him at what point would include the bottle of wine and he gave no answer. His answer would most certainly reveal that in fact, he stiffed the waiter. Unfortunately, I think many people stiff the waitstaff. Either knowingly or unknowingly, but they do stiff them.
Living in a college town, one would think high paid professors would be good tippers. You'd be wrong. According to some of the waitstaff I've talked to, they are some of the worst. Though leaving nothing as a tip is rare, it does happen. The larger problem seems to be more in the amount of the tip and the reason for it. My feeling is people are generally out of touch with how much waitstaff actually make as a base pay, thus leading to the arbitrary tipping practice that they use.
Here are some tips for tipping. Tip based upon the quality of service you get, not how good the meal tastes or whether or the type of lighting. Remember, you are tipping according to what falls under the control of the waitstaff. I think too many people don't have the courage to deal with problems that would be best handled through management and instead, take it out on the waiter or waitress. Here is how I handle it. If i get average service, I leave an average tip. If they are very attentive, take care of my needs and assure that everything meets my expectations, I tip 20% or more. It's not a lot considering what the base pay is. It's a good system and works well as long as we don't abuse it. Take care of your waitstaff and they will take care of you.

Sunday, May 31, 2009

Finally, a place where foodies can share...


I have been looking for some time. I never thought such a place existed that would fit my needs. A place where I could post my recipes and my photos of them. I can keep them there not only for my self, but for my collective friends and family to share. And they can do the same. It's called and it's a pretty awesome site. It's sponsored in part by there own software program which you can buy (with a option for a free trail) to organize recipes and photos. And it comes pre loaded with hundreds right out of the gate! I joined and have been loving it. I set up my profile, and started entering my recipes right away.
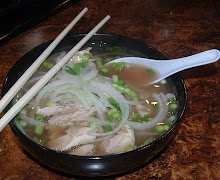
I pick a recipe that I am going to make anyway, and then take photos when their done. Then off to the site I go. Enter the recipe, up load the photo and your done. Here is one for my Pho Ga.I cropped it from an earlier photo. I am working on a new pho recipe which is all but done. Here is a pic of Pho Bo.

Monday, April 28, 2008

Ahhh....is there a porter in the house?


Yes there is....or was that is. Last night I grilled a great Porterhouse steak that was out of this world. My wife and I usually have steak every couple of weeks or so but we tend to stay with the filet. It's less fatty, usually pretty tender and portion wise, it's just right for the two of us.
I must say though, I have been pretty bored with the flavor of the filet and decided to give a porterhouse a try. I'm going to share with you how two people can have a really nice steak, with very little hassle and a whole lot of flavor. Start off by asking your butcher/meat guy to cut (don't take one from the case, chances are it's not the right thickness) a porterhouse steak 2 inches thick.
"Wahhhh?", you say. Not to worry, 2 inches is the perfect size for this steak. I am going to show you how to cook it so that it's rare/med rare. If you have to cook it any more that that...don't read any further. This is the way this cut of meat was intended to be cooked. Now for the grilling.
Make sure the meat has been left out of the fridge so it has a chance to get to about room temp. This will assure proper cook times. (Cold meat takes longer to cook and you could end up with a steak that is too done on the outside to get the inside right an vice versa.)
Pre-heat gas grill to high, and pre-heat oven to 400 deg. Salt and pepper both sides about ten minutes before grilling. When grill is hot, place on grill and start the clock. Cook for 5 minutes (Grill cover closed please).
Turn steak over and cook another five minutes. Pre-heat a large cast iron or oven safe skillet with a tablespoon of butter in it until it's just about to brown. When steak has finished on grill, place steak in skillet and place skillet in oven to "Finish" for 8-10 minutes. At around the 8 minute mark I take my finger and give each side the "finger" test for doneness. If you don't know how to do this, look at chart above. Basically, if the internal temp should be at least 125-130deg for rare when it's in the oven. Remember, it will cook slightly after you remove it (while it rests) so give it a little bit of a lead time.


Once you remove the meat from the oven, let it rest so the juices will stay intact as much as possible when you cut into it. I usually let it rest for about 10 minutes on the cutting board that I bring to the table. No sense leaving the juices behind! Bring the whole thing to the table and cut into the larger portion of meat on one side of the bone. This will be the chewier of the two sections but the flavor is excellent. The tenderloin or other side of the steak is usually more tender, and I generally save this for last...sort of like desert.

Friday, April 25, 2008

The Daily Bread, then we'll see what follows....

I suppose I learned it from watching my mom when I was about 6 or 7. Every once in a while, usually in the winter, she would bake bread on the weekends. There is nothing that is more satisfying then the smell of fresh bread baking in the oven. Nothing can compare to that yeasty, sweet smell that hangs in the air filling every room in the house. You almost instinctively reach for the butter dish when you smell it!
I have been playing around with this bread recipe which is fairly easy to prepare and can be used for almost any meal situation. It is a modified french bread recipe that I found on the Internet...somewhere.
A few tips. I use only King Arthur Flour so if you use other than King Arthur you might not have exactly the same results. Also, use only EVOO for oil. (EVOO seems to be the new acronym for Extra Virgin Olive Oil.) I used a Kitchen Aid mixer for this but that doesn't mean you can't do it by hand. God Bless ya if ya do!
Let's get to it.

  • 6-7 Cups King Arthur Bread Flour
  • 3 tablespoons sugar
  • 1 tablespoon of salt
  • 5 tablespoons olive oil
  • 2 packages yeast
  • 1/2 cup warm water
  • 2 cups hot water
  • heavy pinch of sugar

Start off by taking a small bowl and rinse it out with how water (not boiling, tap will do just fine). This is to take any chill off the bowl. Now put a couple of pinches of sugar at the bottom of the bowl and pour in 1/2 cup of warm water. Water temp should not be too hot else wise you will kill the yeast. Sprinkle the yeast on top and stir with spoon until most is dissolved. Set aside.

In your mixing bowl, put in three cups of flour, salt, sugar (you can sub some of the sugar with honey) and blend with mixing paddle on slow speed to combine. While the mixer is on low, add the 2 cups of hot water and then the 5 tablespoons of oil. Mix on low for one minute and then on the next higher speed for two minutes. Slow the mixer down to low and add the yeast/water/sugar mixture. Mix until combined, about 2 minutes.

Add 1/2 cup of flour on low speed until combined then mix on the next higher setting (#2 on the Kitchen Aid mixer) for two minutes. At some point the paddle will need to be swapped out with the dough hook attachment. You'll know when the time is right when the dough starts to clump on the the center of the paddle, and doesn't work as well. Add the flour a half a cup at a time using a the low (#1) speed at first then increasing the speed (#2) and beating for two minutes. Once the dough starts to pull away from the bowl, and stays off the side, keep the speed on #2 and beat for 10 minutes. This is the kneading phase.

Once the dough as beat for 10 minutes worth of kneading, remove the dough to a oiled bowl and coat the dough ball by shaping it into a ball, then flipping it over in the bowl to coat. Place in warm, draft free place and let rise. I cover my bowl with a terry cloth towel but you can use also use saran wrap. In about an hour, the dough should double in size.

Once the dough has doubled in size (about an hour, maybe a little more) remove dough to a very lightly floured, cleaned, clutter free, kitchen counter. Punch the dough down and remove all the air in it. Pretend it's your boss.

Cut dough into two equal parts and let it rest on same counter under towel for about 10 minutes. This will help relax the dough and make it easier to work with. Roll the dough out into a rectangle and roll into a loaf. Place on baking sheets that are lightly covered with cornmeal. Cover with towel and let rise again for about 1-2 hours. Bake in 400 degree oven, middle rack, for about 30 minutes. Remove from oven and carefully turn upside down and tap your finger on it. If it sounds hollow, you got bread! If not, leave upside down on sheet and return to oven for another five minutes. Okay, if you were smart, you would have taken a stick of butter out of the fridge and hour ago so that it would be nice and soft for your fresh bread! ENJOY!

I don't want to hear any whining about not having time to bake good bread at home. If you got time to watch TV, shop online, go to the mall, surf the internet, or read this blog you got the time. Nuff said.

Variations....

You can use this same recipe to make hamburger rolls, bread sticks, regular rolls whatever. You can add herbs to the flour stage for herbed bread. You can chopped olives and whole garlic to the dough stage as well.